
Next: Creating a service timesheet Up: Managing Timesheets Previous: Creating timesheets
Creating a service timesheet
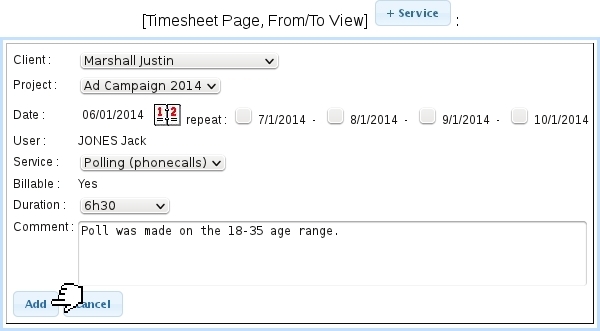
Fig.7.97 shows how a 'service' timesheet is added.
There :
- client, project and user are preselected from above ;
- date, as set by default to the current date, can be modified by clicking on the calendar icon. Timesheet can also be repeated the few next days ;
- service : if allowed services had been defined for the project, those are the ones that are shown in this menu. If project has no defined allowed service, user's services are shown ;
- the 'Billable:' field contains either 'Yes' or 'No' or a menu with those, according to the billing of the service article chosen above ;
- finally a duration in hours (with half-hour increments) is picked and a comment is filled.
Upon click on ![]() , the service timesheet is created, and another one can be done right after ; the panel is dismissed with
, the service timesheet is created, and another one can be done right after ; the panel is dismissed with ![]() . Service timesheets feature in the following order the client, the date, the user (with the service article), the project and comment, and the duration :
. Service timesheets feature in the following order the client, the date, the user (with the service article), the project and comment, and the duration :

When switching back to the Monthly View, a summary for Service timesheets is provided on each day line ; further details can be then viewed by putting mouse cursor over the ![]() icon :
icon :

Clicking on a day line in the Monthly View brings up the Range View with boundaries set to that day.
Subsections
Next: Creating a service timesheet Up: Managing Timesheets Previous: Creating timesheets